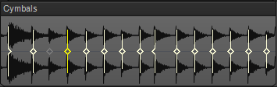
Cakewalk // Documentation // SONAR X2 // Editing transient markers
Table of Contents Previous Next Index

AudioSnap (Producer and Studio only) ► Editing transient markers

Most AudioSnap commands edit transient markers automatically as a result of an editing operation, but sometimes you achieve the best results by editing the markers manually.
You can edit the markers by moving them to new locations, adding markers, filtering out markers, deleting markers, and promoting markers (protecting them from being filtered).
Figure 200. Transient markers
3.
Right-click a clip and choose Select Markers > All or Select Markers > None on the pop-up menu.
3.
Do one of the following:
Note 2: To specify the size of the time window, click the AudioSnap Options button in the AudioSnap palette to open the AudioSnap Options dialog box, then specify the desired Pool Transient Window value.
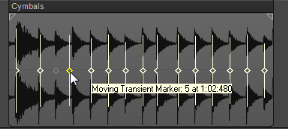
When editing multi-track instruments, you may want to simultaneously adjust a range of transients across multiple tracks. In order to do so, you need to select the tracks and time region you want to edit.
list-image
list-image
Select Markers > Stretched
list-image
Select Markers > Disabled
list-image
Select Markers > Enabled
list-image
Select Markers > Promoted
list-image
When you drag and drop the line of a marker, the marker moves to the place where you drop it, and the audio that is located between the dragged marker and the following marker stretches.
list-image
Right-click the marker you want to reset and select Delete Marker from the pop-up menu.
1.
Disable the Snap to Grid button (or press the N key) if the place you need the marker is not on a convenient snap location.
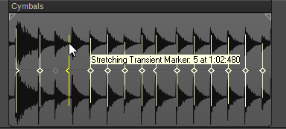
3.
Select the target clip (the clip that you want to copy markers to) and drag the Threshold slider in the AudioSnap palette until all transient markers are disabled.
5.
Right-click either of the selected clips and select Merge and Lock Markers from the pop-up menu.
It’s sometimes necessary to disable some of the markers so you can extract a clearer groove, or snap or quantize data to only the more important markers. Disabling markers is a way to thin the data so that it creates a clearer time grid to work with. It also avoids stretching any transients that you don’t want to stretch as a result of quantizing audio. Disabled markers are not deleted, but are ignored by all AudioSnap functions. Only the head of a disabled marker remains visible.
list-image
The Resolution drop-down list in the AudioSnap palette. The selected Resolution value lets you disable markers based on their time location. This clears out unwanted markers to make editing easier. Larger values create a bigger time window, based on musical time values, which preserves markers that are closest to the displayed musical time value, and disables others.
Note: The Resolution setting will only work reliably if the audio clip’s internal tempo map is accurate. For details, see Editing a clip’s tempo map.
list-image
The Threshold slider in the AudioSnap palette. This slider works by disabling markers based on their volume. Dragging the slider to the right creates a larger volume threshold, so that transients that fall below the current volume threshold that the slider defines are disabled.
list-image
The transient marker context menu. You can right-click a marker, and choose Disable from the pop-up menu.
Tip: If you want to protect a marker from being disabled by the Sensitivity slider or the Threshold slider, you can right-click the marker and enable the Promote option from the transient marker pop-up menu. You can also promote a disabled marker to ensure that it never becomes enabled by the Sensitivity slider.
list-image
Do one of the following:
Note: TAB to transients is selection-based, which means tabbing will go to the next/previous transient amongst all selected clips. If there is no selection, tabbing operates on the current track.
A promoted marker is never disabled by the Resolution or Threshold controls in the AudioSnap palette.
Note: An important difference between quantizing MIDI and audio is that two or more audio transients can never collapse on top of each other like MIDI notes can.
The transient marker context menu appears when you right-click a transient marker. The command you choose from this menu acts on the marker that you right-click, and most commands also act on any markers that are selected. The following table describes each command.
By “promoting” a marker, you can set emphasis on certain beats and prevent the marker from becoming disabled when you adjust the Resolution or Threshold controls. Shortcut for selected markers is CTRL+ALT+P.
Only available for manually added markers; the command is greyed-out if you right-click an automatically generated marker. Shortcut for selected markers is CTRL+ALT+BACKSPACE.
Snap (stretch) to nearest transient
Note: You can also snap transient markers to the time ruler and other transient markers. For details, see To add the Time ruler to the Pool and Snapping edits to audio beats.
Moves the marker to the project time that you enter in the To Time field, and stretches the audio that is between the previous and next markers.

Copyright © 2024 Cakewalk, Inc. All rights reserved
Sitemap | Privacy Policy | Legal