Once your SONAR project is complete, you will want to share it with the world or burn a CD. SONAR offers many tools to help you do this. In this tutorial, we are going to explore some of the basics of these tools.
Before we get started, let’s open one of the example audio projects included with SONAR. If you have your own project that already contains audio, you can load that instead. However, your screen will look different from the images in this tutorial.
Now that you have opened the demo project (or your own audio project), click the Play button

or press SPACEBAR listen to it. If you do not hear any audio, review the steps in Tutorial 1 to ensure SONAR and your audio device are configured correctly.
Cakewalk Project Files are different from the audio you hear on a CD in that they are often multi-track. In this example, you will notice that there are four audio tracks. In order to burn this mix to a CD or prepare it for distribution, we need to
export or
mix it down to a
stereo track.
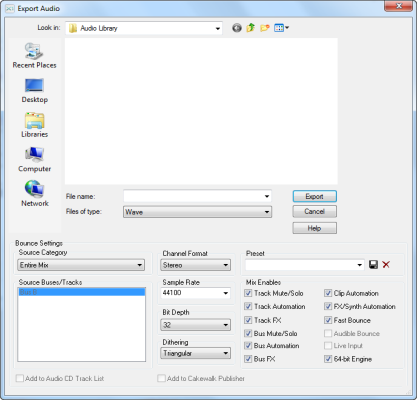
This will bring us to the Export Audio dialog box. This has many useful functions. Let’s explore some of them in detail.
You should notice that the top half of this window is very similar to the Open and
Save dialogs that were discussed in
Tutorial 1 – Creating, playing, and saving projects. This is used to navigate to locations on your computer’s hard drive and tell SONAR where you want to store the exported audio.
Now we need to burn our mix to a CD. SONAR features a powerful built-in CD burning application that can do this for us. Let’s open Audio Creator LE and briefly explore its features and how to use it.