
|

|

|

|
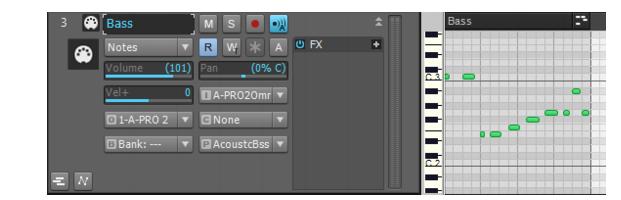
In Cakewalk programs, the file that you use to store usually a single song’s data is called a project. This is the file you use to record, play back, and edit your song. The file extension for a project is .wrk in older Cakewalk programs and .cwp in newer ones. Projects that use only the MIDI format (no digital audio) can be saved in a format called a Standard MIDI File, and can then be played back in any program or machine that plays MIDI files. These files have the extension .mid.The MIDI messages within a project are usually separated into smaller containers called tracks, and even smaller containers called clips, which are sections of a track. You usually use tracks to separate the MIDI messages that are intended to play one kind of sound from the MIDI messages that play other sounds. You usually assign each track to its own MIDI channel. A typical MIDI project might have separate tracks for drums, bass, and piano. In this example, you might assign the bass track to Channel 2, and the piano track to Channel 5. Then you would set your MIDI sound module to play a bass sound on Channel 2, and a piano sound on Channel 5. Instead of manually setting your MIDI modules to play these sounds, you can send Program Change messages to tell your sound module what sounds to play on what channels (see Controlling which sounds you hear). You usually assign drum tracks to Channel 10. Because you stored the MIDI messages that are assigned to each sound on separate tracks, you can then control and edit the stored MIDI messages that go to one sound without changing the messages that are sent to other sounds.Figure 27. Track view.A. Tracks 1 through 6 B. Buses C. Track pane D. MIDI messages recorded in Tracks 3,4, and 5 E. Clips pane F. Vertical Zoom fader—drag to change track heightNotice that when you record any data into a track, that SONAR displays a visual representation of the track’s data in the Clips pane. In the above picture, Tracks 1, 2, and 6 are still empty, while Tracks 3, 4, and 5 contain recorded data. Also notice that Track 3 is a different color from the other tracks, meaning that it has the focus, and will make the bass sound when you play your MIDI keyboard (controller). If you click one of the other MIDI tracks to change the focus, the sound that’s selected for that track will sound when you play your controller.In the above picture, we zoomed in far enough by dragging the Vertical Zoom fader (see previous picture) to expose the track property fields for each track. Use these to choose what MIDI channel each track is sending its messages out on, what sound (patch) the track is sending the messages to, how loud the overall track volume is, what MIDI instrument you’re sending the track’s data to, and several other property choices. Notice that the track’s number and its MIDI channel are not the same. Track numbers and MIDI channels have nothing to do with each other, although you may want to keep them the same in a small project to make remembering them easier. We could have sent Track 3’s MIDI messages out on any channel we wanted, just by selecting a different number in the Ch field. Notice the MIDI cable logo just in front of the track name; the audio track above it has a different logo to identify it as an audio track. The audio track has different track property fields from the MIDI track (notice there’s no Ch field).

Tip - Searching Documentation
Tip: To search for a specific topic, type your search query in the Search Cakewalk.com field at the top right of this page.
When the search results appear, click which product's documentation you would like to search to filter the search results further.
Note - Using Offline Help
Note: If you prefer to always use offline Help, go to Edit > Preferences > File > Advanced in your Cakewalk software and select Always Use Offline Help.
If you are not connected to the internet, your Cakewalk software will default to showing offline help until an internet connection becomes available.