Cakewalk // Documentation // SONAR // Matrix view user interface
Table of Contents Previous Next Index

View referenceMatrix view ► Matrix view user interface

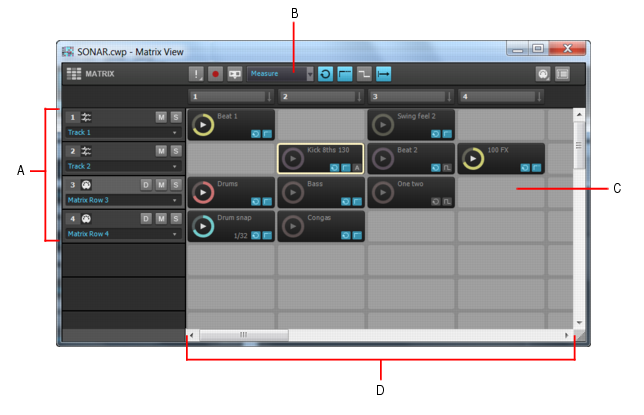
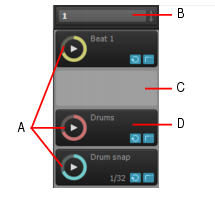
Figure 685. The Matrix view.
A. Rows B. Toolbar C. Cells D. Columns
*
Toolbar. The toolbar contains controls that let you specify how patterns are triggered. For details, see Toolbar.
*
Rows. Each row is assigned to a track and can play one pattern at a time. A row can be routed to any track in your project. For details, see Rows.
*
Columns. Each column contains one cell for each row. An entire column can be triggered at once. For details, see Columns.
*
Cells. A cell is simply a pattern holder. You can drag one pattern into each cell, or leave the cell empty. Only one cell per row can be triggered at a time. For details, see Cells.
A. Stop All Cells B. Capture Matrix Performance (arm Matrix for recording) C. Follow Transport D. Global Trigger Resolution E. Global Loop Mode F. Global Latch Mode G. Retrigger Mode H. Cell Start I. Cell MIDI Trigger J. Options
The Matrix view toolbar contains the following controls:
*
Stop All Cells . When the Stop All Cells button is enabled, all playing cells stop. The small arrow next to the Stop All Cells button lets you access a drop-down menu with the following commands:
*
Clear All Cells. This command lets you clear the content from all cells.
*
Clear All MIDI Learn. This command lets you clear MIDI Learn assignments from all cells.
*
Capture Matrix Performance . When the Capture Matrix Performance button is enabled, you can record the current Matrix performance into the Clips pane during playback. Rows are recorded to their assigned output tracks. For details, see To record a performance into the Clips pane. You can also perform a Quick Capture of a single pattern. For details, see To render a single pattern to the Clips pane (Quick Capture).
*
Follow Transport . This toggle lets you specify if the Matrix view should follow SONAR’s main transport (Play/Stop) commands. When Follow Transport is enabled, patterns will only play when SONAR’s transport is rolling. When Follow Transport is disabled, you can play the Matrix while SONAR’s transport is idle (if you start SONAR’s transport in this mode, cells that are already playing will immediately update their positions to synchronize with SONAR’s transport). For details, see To synchronize the Matrix with SONAR’s transport.
*
Trigger Resolution . This menu lets you specify the time lag between when you trigger a column or cell, and when it starts/stops playing. The options are as follows:
*
Immediate. Playback starts immediately.
*
Next Measure. Playback starts on the next measure boundary. This is the default setting.
*
Next Beat. Playback starts on the next beat.
*
Next 1/8 Note. Playback starts on the next 8th note.
*
Next 1/16 Note. Playback starts on the next 16th note.
*
Next 1/32 Note. Playback starts on the next 32th note.
*
Next 1/64 Note. Playback starts on the next 64th note.
*
Global Loop Mode / . This toggle lets you specify if a triggered cell should repeat indefinitely, or stop when it reaches the end. When Loop is enabled , a triggered cell loops indefinitely. When Global Loop Mode is disabled , a triggered cell plays once then stops. This option is enabled by default.
*
Global Latch Mode / . This toggle lets you specify if a triggered cell should stop or keep playing after you release the mouse button or MIDI key. When Global Latch Mode is enabled , a triggered cell will continue to play after you release the mouse button or MIDI key. When Global Latch Mode is disabled , a triggered cell will stop playing when you release the mouse button or MIDI key.
Note: Together, the Global Latch Mode and Global Loop Mode toggles give you flexible control over how cells are triggered.
list-image
To play a cell continuously when triggered. Enable Global Loop Mode; enable Global Latch Mode
list-image
To play a cell once through when triggered. Disable Global Loop Mode; enable Global Latch Mode
list-image
To play a cell continuously as long as the mouse/note is held. Enable Global Loop Mode; Disable Global Latch Mode
list-image
To play a cell as long as the mouse/note is held, but stop at end. Disable Global Loop Mode; disable Global Latch Mode
*
Retrigger Mode / . This toggle lets you specify if a cell should stop or retrigger from the beginning if triggered during playback. When Retrigger Mode is enabled , triggering a playing cell will restart the cell from its beginning. When Retrigger Mode is disabled , triggering a playing cell will stop the cell from playing.
*
Cell Start / 
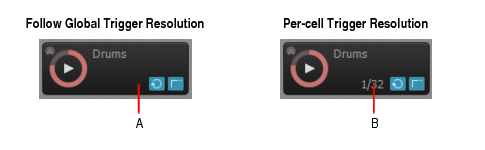
. This toggle lets you specify globally if a pattern should start from the beginning of the pattern, or if playback may start in the middle of a pattern in order to synchronize with the project’s Now time. The two modes are as follows:
*
Always from Beginning . When you trigger a cell, the pattern will start playing from the beginning of the pattern, after the amount of time listed in the Trigger Resolution menu.
*
Offset to Now Time . When you trigger a cell, the pattern will start playing in sync with the Now time after the amount of time listed in the Trigger Resolution menu. It’s as if the cell’s pattern is repeated throughout the song and you unmute the pattern at a certain point. This is the default setting.
*
Cell MIDI Trigger . This toggle lets you enable/disable MIDI control over the Matrix view. Click the small arrow next to the Cell MIDI Trigger button to specify which MIDI channel the Matrix view should respond to (select Omni for all channels).
*
Options . Click the Options button to open the Matrix Options dialog box. The following options are available:
*
Empty cells stop active cells when triggered. This option determines how playing cells are affected when triggering an empty cell in the same row. If Empty cells stop active cells when triggered is disabled (default), triggering an empty cell has no effect on other cells. If Empty cells stop active cells when triggered is selected, triggering an empty cell in a row will force the row to stop playing. Likewise, triggering a column that contains empty cells will force the corresponding row to stop playing. This option is disabled by default.
*
AutoScroll to Column when Triggered by MIDI. This option allows the Matrix view to automatically scroll a column into view if one of the column’s cells are triggered by MIDI.
*
Import all audio as GrooveClips. This option forces all audio to be imported as Groove Clips.
*
Follow Transport Restores Pending Cells on Stop. When Follow Transport is enabled, you can queue up multiple cells to trigger when the transport starts. If Follow Transport Restores Pending Cells on Stop is enabled, all cells that were queued up to trigger will be pending again when the transport stops, even if the cells were manually stopped during playback.
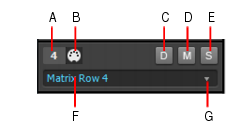
*
Unlink Step Sequencer clips from Clips pane. When you drag a Step Sequencer clip to a Matrix cell, the clip data and cell data are linked. If you want the original clip and Matrix cell to be independent, clear the Unlink Step Sequencer clips from Clips pane check box.
Figure 687. Matrix view row.
A. Row number B. Data type icon (audio or MIDI) C. Direct Mode (MIDI rows only) D. Mute/unmute row E. Solo/unsolo row F. Assigned track G. Click the arrow to re-assign the row to a different track
*
Row number . Sequential number to identify each row.
*
Data type icon / 
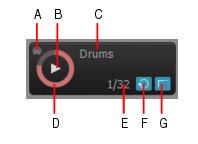
. The icon indicates if the row contains audio data or MIDI data . Rows that are assigned to audio tracks can only contain cells with audio data. Likewise, rows that are routed to MIDI or Instrument tracks can only contain cells with MIDI data. The Audio or MIDI identity of a row is established when the first pattern is dragged into the row.
*
Direct Mode (MIDI rows only) . By default, a MIDI row is routed through the assigned MIDI track, and all track processing is applied, including MIDI FX, Arpeggiator, volume, etc. To bypass all track processing and send a row directly to the soft synth or hardware output that is assigned to the target track, click the row’s Direct Mode button .
*
Mute . Mute/unmute the row.
*
Solo . Solo/unsolo the row.
*
Destination track. Each row displays the name of the track it is routed to. All cells in the row are routed through the assigned track. Click the small arrow to reassign the row to another track.
A. Rows 2-3 are highlighted since they are assigned to the active track
A. Column 1 trigger B. Column 1 C. Column 2 trigger D. Column 2
*
Rename Column. Use this command to assign a custom name to a column header. By default, a column does not display any name. For details, see To rename a column header.
*
Insert Column. Use this command to insert a new blank column. For details, see To insert a new empty column.
*
Duplicate Column. Use this command to duplicate an entire column. For details, see To duplicate an existing column.
*
Clear Column. Use this command to clear all cells in the column. For details, see To clear all cells in a column.
*
MIDI Learn. Use this command to assign a MIDI event to a Column Trigger, which allows you to trigger all cells in the column via MIDI remote control. The MIDI Learn command shows an orange outline around the Column Trigger if it is already in MIDI Learn mode, and shows a small MIDI icon if there is already a MIDI event assigned to the Column Trigger.
*
Clear MIDI Learn. Use this command to remove any MIDI assignment from the Column Trigger. The column will no longer be triggered via MIDI remote control.
Figure 690. Matrix view cells.
A. Filled cells (contain patterns) B. Column trigger (click to play all cells in a column) C. Empty cell D. Playing cell with progress indicator
Figure 691. Matrix view cell.
A. MIDI Learn indicator B. Trigger area C. Cell name D. Progress indicator E. Loop mode F. Latch mode G. Trigger mode (blank if Follow Global is enabled)
*
Cell name. The name of the cell. By default, a cell displays the name of the assigned pattern, but the cell can be renamed. For details, see To rename a cell.
*
Progress indicator. During playback, a cell displays a circular progress indicator to show the position of the loop as it is playing.
*
MIDI Learn indicator. The MIDI Learn indicator shows if the cell has been assigned to MIDI remote control.
*
Trigger area. Click the Trigger area to trigger the cell according to the global Trigger Resolution and Cell Start settings.
*
Loop mode. Each cell has a Loop Mode button, which lets you override the Global Loop Mode setting. By default, each cell inherits the Global Loop Mode setting. When a cell’s Loop Mode toggle is enabled, the cell will no longer follow the Global Loop Mode setting. For details, see To use independent Loop mode per cell.
Note: After a cell’s Loop Mode button has been engaged, the cell will no longer continue to follow the Global Loop Mode setting, even if you disable the cell’s Loop Mode button. To restore the link to the Global Loop Mode setting, hold down the CTRL key and click the cell’s Loop Mode button.
*
Latch mode. Each cell has a Latch Mode button, which lets you override the Global Latch Mode setting. By default, each cell inherits the Global Latch Mode setting. When a cell’s Latch Mode toggle is enabled, the cell will no longer follow the Global Latch Mode setting. For details, see To use independent Latch mode per cell.
Note: After a cell’s Latch Mode button has been engaged, the cell will no longer continue to follow the Global Latch Mode setting, even if you disable the cell’s Latch Mode button. To restore the link to the Global Latch Mode setting, hold down the CTRL key and click the cell’s Latch Mode button.
*
Trigger Resolution. By default, a cell follows the Global Trigger Resolution, as specified in the Matrix view toolbar. You can also assign a custom trigger resolution to each cell, instead of following the global trigger resolution. For details, see To use a per-cell trigger resolution.
A. Follow Global Trigger Resolution (no resolution is displayed) B. Per-cell Trigger Resolution (assigned resolution is displayed)
*
Import File. Use this command to import a file into a cell.
*
Rename Cell. Use this command if you want to rename the cell.
*
Clear Cell. Use this command to remove any pattern and MIDI assignment from the cell.
*
One-Shot Trigger. Use this command to configure a cell as a one-shot sample. A one-shot cell plays one repetition from beginning to end and ignores any loop and latch settings.
*
MIDI Learn. Use this command to assign a MIDI event to a cell, which allows you to trigger the cell via MIDI remote control. The MIDI Learn command shows an orange outline around the cell if it is already in MIDI Learn mode, and shows a small MIDI icon if there is already a MIDI event assigned to the cell. You can use the MIDI Learn command on both active and empty cells.
*
Clear MIDI Learn. Use this command to remove any MIDI assignment from the cell. The cell will no longer be triggered via MIDI remote control.
*
Trigger Resolution. Assign the desired trigger resolution to the cell. A cell can either follow the default Global Trigger Resolution setting, or a per-cell trigger resolution. The following settings are available:
*
*
Copyright © 2024 Cakewalk, Inc. All rights reserved
Sitemap | Privacy Policy | Legal