Project5 Version 2 - Track Pane
Last updated on 3/18/2016The information in this article applies to:
- Project5 Version 2
The Track pane is where you control individual track parameters such as volume, pan, mute, arm, solo, input monitoring, audio inputs, and MIDI routing. You can also create track lanes in the Track pane, so that you can drag overlapping patterns into their own lanes.
Note: double-clicking a track's volume, pan, or width control sets the control to its default value.
Here's a picture of the controls in the Track pane:
The following two tables describe the parameters in both audio and MIDI tracks in the Track pane:
|
Audio Track Parameter. |
Description. |
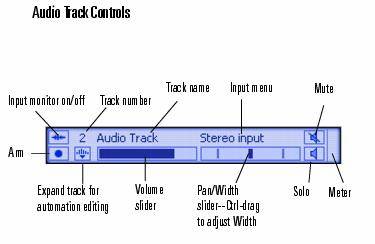
| Input monitor button | If you're recording audio, you can enable this button to hear the instrument or voice that you're recording together with any plug-in effects that are on the armed track. |
| Track number | This number represents the order the track appears in the Track pane. If you drag an individual track strip to another location, the name of the strip that you drag stays the same but its number changes. |
| Track name | A name for the track that you can edit. Double-click the name to enable editing, and press Enter to save your name change. |
| Input menu | Click this menu to set the audio input to Stereo, Left, Right, or None. Choose None if you want to record automation on the track without recording audio data. |
| Volume slider | Use this slider to adjust the track's volume as it goes to the Master bus. The minimum volume for a track is -INF (no volume) and the maximum volume is 6 dB. |
| Pan slider | Use this slider to change the stereo balance for the track. This value ranges from 100% Left to 100% R. Center is represented by C, which is the default value. |
| Width slider | Ctrl-drag the Pan slider to adjust Width. Width is the perceived distance between the left and right stereo channels. Width ranges from 0 to 120 degrees. 0 degree is effectively mono while 120 degrees is extreme left/right separation. |
| Mute button | Click this button to silence a track. |
| Solo button | Click this button to play only this track and any others that are soloed. |
| Volume meter | Displays the track's volume level. |
| Arm button | Click to arm the track for recording. |
| Show/HIde Automation button | Click this button to expand the track so that there is space below the track in the Arrange pane to view and edit track automation. |
|
|
|
|
MIDI Track Parameter. |
Description. |
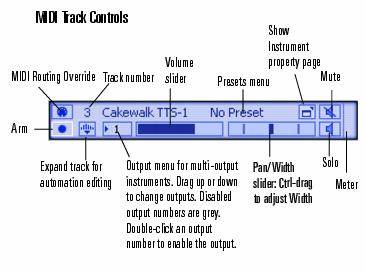
| MIDI Routing Override button | Clicking this button to the on position forces all live MIDI input through this track only. You can enable the button on multiple tracks by holding the Ctrl key down while you click each button. |
| Track number | This number represents the order the track appears in the Track pane. If you drag an individual track strip to another location, the name of the strip that you drag stays the same but its number changes. |
| MIDI indicator light | Behind the track number is an indicator light that lights up when the track receives MIDI data from either live input or from a pattern in the track. |
| Track name | A name for the track that you can edit. Double-click the name to enable editing, and press Enter to save your name change. |
| Preset menu | If you want to save or load some particular parameter settings of the track's instrument, you can use the Preset menu. An instrument preset does not save effects, effect parameters, or remote control assignments, so if you want to save these along with your instrument's settings, save a device chain instead of a preset. See Loading and Saving Device Chains for more information. |
| Show Instrument Property Page button | Click this button to display the property page of the instrument that is patched into this track. You can also open the property page from the Presets menu, the Track pane context menu (right-click to open this menu), or by double-clicking the track number. |
| Arm button | Click to arm the track for recording. |
| Show/HIde Automation button | Click this button to expand the track so that there is space below the track in the Arrange pane to view and edit track automation. |
| Output menu | When you load a multi-output instrument into a track, the track displays the Output menu. This menu shows you which output the track controls apply to. You can display controls for a different output by dragging up or down on the menu. To enable an output, double-click its number in the menu so that the number is not grey. |
| Volume slider | Use this slider to adjust the channel's volume as it goes to the Master bus. The minimum volume for a track is -INF (no volume) and the maximum volume is 6 dB. |
| Pan slider | Use this slider to change the stereo balance for the track. This value ranges from 100% Left to 100% R. Center is represented by C, which is the default value. |
| Width slider | Sets the perceived distance between the left and right stereo channels. Width ranges from 0 to 120 degrees. 0 degree is effectively mono while 120 degrees is extreme left/right separation. |
| Mute button | Click this button to silence a track. |
| Solo button | Click this button to play only this track and any others that are soloed. |
| Volume meter | Displays the track's volume level. |
See:
Track Pane Context Menu
Arrange Pane
Bus Pane