Setting Up a MIDI Device as a Control Surface in SONAR
Last updated on 3/28/2016By Jesse Recinos, Cakewalk Senior Technician
The Space Race
For many of us, recording and mixing our music at the computer can become a tug of war between our keyboards and mice, trying to wrest as much control as we can over our software while maintaining finesse and efficient workflow. Of course, the next step for many is to add more gear; mixers, MIDI keyboards, and controllers. This leads to endless switching between mouse and keyboard, keyboard and mixer, keyboard and keyboard (computer and MIDI respectively), and so on. Even if you have the physical space to arrange all of your most used tools within an arms reach, the shear number of knobs, buttons, and sliders can make you feel more like Mission Control rather than a musician.
One way to simplify things is to control your mixing, transport, and other common functions from one centralized location. As a quick look in any major music store will attest to, few would question the usefulness of a control surface (and in fact SONAR 2.0 has dedicated support for many of these devices). However, for those of us who are short on money or studio space, there's a way to take advantage of the Control Surface support in SONAR 2.0 using just about any type of MIDI Controller, digital mixer, knob box, or even your MIDI keyboard.
Choosing a Device
In the 20 years that MIDI has existed, manufacturers have come up with just about every type of MIDI controller imaginable. Digital mixers can be an ideal controller as there are already volume faders, panning knobs, and in some cases even transport controls. These controllers are already labeled and most likely already assigned to send dedicated MIDI data. Its an easy choice for those who already own them. Dedicated knob boxes such as the Doepfer Pocket Dial or Kenton Control Freak also offer simple compact ways to transmit data into the computer. However, to prove how useful the Cakewalk Generic Surface template can be, lets start with a MIDI Device that almost everyone has, a MIDI keyboard.

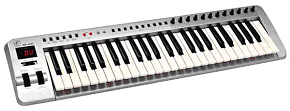
Whether you're a classically trained pianist or a producer trying to put together a remix, a keyboard is essential. Most people like to work with their keyboard near or in front of their computer, which doesn't leave a lot of space for other devices. It makes sense, then, to make the most of that keyboard and the precious space it occupies. In this example I'll use an Evolution MK-249C, a handy USB powered, 49 key controller with 12 knobs and a sustain pedal input.
Getting Started
- First, make sure that your MIDI Device is hooked up to the computer and that the inputs/outputs are selected in Options | MIDI Devices.
- Next, you'll want to go to View | Toolbars and make sure that "Control Surfaces" is checked.
- Finally, go ahead and open up Options | Control Surfaces. If there are any Control Surfaces already listed here, select them and hit the red 'X' to delete them.
-
Now press the yellow 'Add New Control Surface' button and choose Cakewalk Generic Surface. Make sure the input and output port are configured as well.
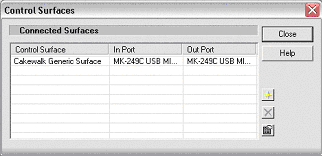
Go ahead and hit close. You should now be able to see the control surface listed in the Control Surfaces toolbar. To its immediate right is a field showing the active track and then a button to open up the Control Surface parameters. Go ahead and open the parameters now.

Next, you'll want to make sure your chosen MIDI device is setup. In the case of the Evolution, all of the knobs are defaulted to send MIDI controller data. Depending on what device you are using, you may need to configure the unit to send MIDI data and then assign MIDI values to its various widgets. If the unit is already configured to send MIDI, not to worry, you can figure out what values are being sent by recording some fader movements into a blank MIDI track and then examining the Event List, or you take advantage of the "Learn" feature and let Cakewalk do the work for you.
Layout
Before diving in, it pays to spend a little time thinking about how you want to use your control surface and what functions you'd like to control. Consider the following things:
- How deep do you want your control to be? Is Volume/Pan enough or do you need to control track arming, aux sends, and automation?
- What's the number of faders and knobs that you have to control parameters with? Don't forget that Sustain pedals and foot controllers can be used as well.
- You can assign widgets to control which track is the base track. This lets you user more controllers for track parameters in exchange for controlling fewer tracks at a time.
- Faders, Knobs, Buttons, and Pedals all lend themselves for different types of controls. For example, faders are obvious for volume controls while buttons are good for arming/muting/soloing.
- Be prepared to Compromise. You don't need to be able to control every function at every time. Try to group together common tasks such as recording, mixing, etc. These can be saved into different presets and accessed as you move through different phases of your project.
Based on the points above, you should be able to decide on whether you'd like to have more control over one track at a time or whether you'd like to have access to more track strips simultaneously. For example, the Evolution has 12 knobs on it. I could use these to control 12 track parameters on the base track such as volume, pan, phase, mute, solo, arm, aux 1 send level, aux 1 send pan, etc. Instead I think I'll choose to control the volume and pan of six different channels simultaneously while creatively utilizing some other controls such as pitch wheel, mod wheel, and sustain for functions such as transport.
Setting up your Template
First off, if you get stuck at any time while in the Cakewalk Generic Surfaces property pane or you're a little confused about what we've discusses so far, simply click F1 to view the extensive help files and tutorial on the subject.
Now go ahead and open up the Control Surface properties from the Toolbar. First you'll want to select the number of tracks you want to control simultaneously via the 'Number of Track Strips' field at the top. Regardless of the number of strips, start by configuring strip number one.
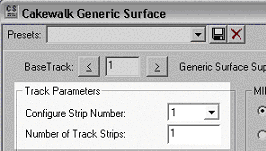
Start with the track parameters. Select Parameter 1 and choose the parameter you wish to control. Now you can proceed one of two ways: if you know what MIDI data your device sends, choose the type and channel on the right side of the screen. If, however, you're not sure what values your controller sends or you'd find it faster, simply use the learn function in SONAR. To do so, choose the parameter you wish to control, move the corresponding widget on your MIDI device, and then hit the learn button in the Properties page. If you move the widget again, you should see the corresponding parameter in the track view change. Proceed to assign the rest of your track parameters and Global parameters.
An Example
In this instance, with our example device, the Evolution, I've decided to control volume/pan on 6 tracks simultaneously. I'll also set up controls for track arming, switching the active track, and some basic transport controls. Here's how:
- Set 'Number of Track Strips' to 6.
- Choose Parameter 1=Volume. Twiddle knob 1, press Learn.
- Hit the right bracket ']' key to advance to the next track.
- Twiddle knob 3, press Learn.
- Repeat until I program knob 11, at which point I change to Parameter 2=Pan.
- Twiddle knob 12, press Learn.
- Hit the left bracket '[' key to move to the previous track.
- Twiddle knob 10, press Learn.
- Repeat with all of the even numbered knobs until you finish with knob 2.
To change which tracks I'm controlling, I'll assign a controller to 'Move Bank Left' and 'Move Bank Right'. This way I can shift between 1-6, 7-12, 13-19, etc.
- Under Global Parameters select 'Move Bank Left'.
- Under the MIDI setup window on the right, select Controller and set the field value to 1 (Mod Wheel) and the 'Trigger Value' to 0.
- Select 'Move Bank Right'.
- Choose Controller 1 again and set the 'Trigger Value' to 127.
Now by moving the Mod Wheel to either extreme, I can choose which bank of tracks I'm controlling. To move several banks, simply move the wheel to one extreme, return it to the center, and then move it to the extreme again.
I want to add some basic transport controls to my template which I'll map using the Pitch Wheel and Sustain Pedal.
- Select 'Play' under Global Parameters. Now choose MIDI message 'Wheel' with a trigger value of 127.
- Repeat for 'Stop' using a trigger value of 0.
- Choose the 'Rewind' parameter and assign it to Controller 64 (Sustain).
- MIDI Message Interpretation should be set to On=127, Off=0.
I am now able to start playback by pushing up on the Pitch Wheel and to stop by pushing down. To rewind, I simply hold down the sustain pedal and then release.
Creating Presets
I'm now going to name this preset 'Mixdown'. I'll probably want to create another preset for recording. Here are some ideas on how to set it up:
- Assign a button to 'Record'.
- Assign a single knob to perform both Solo and Track Arm depending on direction. Both functions will use the same controller number, but their trigger values will reflect extreme ends of the knobs movement, for example 0 and 127.
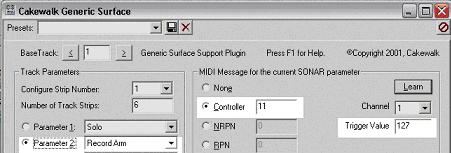
- Take control of automation by assigning a button to 'Write Arm' and 'Record Automation' allowing you to record your controller automation without ever touching a mouse.
- By minimizing the properties page so that you can just see the Preset menu, you can quickly toggle between different functions.
Running the Show
Using these guidelines you'll be able to control SONAR 2 with everything from faders to pedals to brainwaves (seriously!). I'll leave you with a list of tips and creative ideas to help you take control.
- You can use Hot Keys to navigate the Control Surface Properties page and speed up your device setup.
- The brackets '[' and ']' will change the track strip you are currently configuring.
- Alt+L activates the Learn button.
- Alt+number key selects a specific track parameter
- Try using a latching footswitch with the sustain jack for transport functions or triggering arm, mute, record, etc.
- The sustain pedal can be used to arm a track; once you've hit record you can release the pedal and the track will stay armed
- Don't forget you can assign two functions to a controller using different Trigger Values.
- You can add key-bindings (Options | Key Bindings) for control over even more functions, for example using a controller and key combination to perform an Undo.
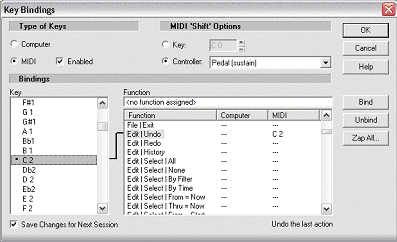
- Create a template preset called 'New' or 'Blank' in which all of the controls are set to 'none.' If you ever want to record the controller information from your keyboard or simply control a soft-synth, you can switch to this preset to disable your other remote functions.