Sonitus fx:reverb
Last updated on 3/29/2016by Willy Jones
Probably one of the most common effects used, some amount of reverb is likely found on most every professional recording you listen to. The Sonitus Reverb uses a high quality reverb algorithm with a minimal CPU hit compared to some of the convolution reverbs that are now very common. This plug is a great tool for setting up quick reverb sends and adding some depth to your mix.
In this tip we are going to explore how to use reverb as a send effect. This is the most common use for reverb and is very helpful as it prevents having to insert the reverb effect into every track you'd like to use it on. Set-up and routing takes a bit longer but the result is a much more efficient way of working. We are going to work with the last 32 measures of the demo project included with SONAR 7. If you'd like to follow along, you can download the bundle file. (approx. 158 MB)
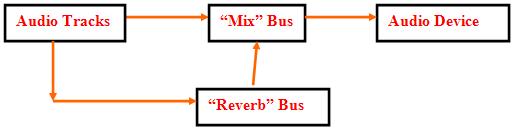
Open up the bundle file and take a look at how the tracks are routed. You will notice that all of the tracks have their output set to a bus named "Mix". A diagram of the routing is below. Click play and give the project a listen.

Now we need to add some reverb to the mix. To accomplish this we're going to create a new bus in our project and then route some of the signal from each track to the bus. This can be done from either the Track or Console view. For this example, let's switch to the console view (Views | Console) and do the following; if you get lost you can use the image below for reference.
Tip: if you can't find all of the options or selections mentioned in the steps below it might be because they have been hidden. SONAR allows you to hide parts of the console view you don't use often by clicking the show/hide buttons listed vertically on the far left of the Console view.
- Insert a new bus into the project - this can be done right-clicking in the empty space to the right of the "Mix" bus and choosing 'Insert Stereo Bus'
- Let's name this bus "Reverb" - you can rename a track or bus by double-clicking on it's label
- Then let's change the output of this bus to the "Mix" bus that is already present. This can be done by clicking on output dropdown menu right above the bus label.
- Finally let's insert the Sonitus Reverb into our new busses fx bin. The bus pane of your Console view should now resemble the image below
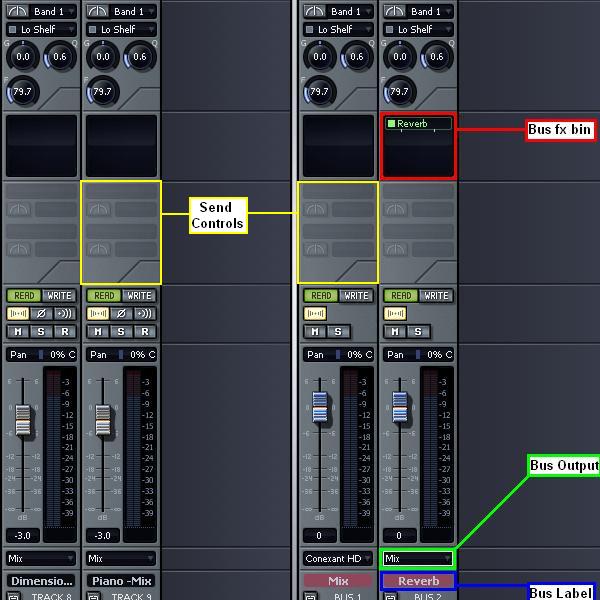
Ok so now we have our new "Reverb" bus and we have inserted the Sonitus Reverb effect into the project by inserting it into our newly created "Reverb" bus. The next step is we need to route some of the signal from our audio tracks to this bus.
- In the Console view locate Track 1 named "Drums-Mix" it should be the first track on the left.
- You will notice that the send controls appear dimmed out - this is because we have not created a send yet. Let's create one that is routed to the "Reverb" bus. This is done by right-clicking on the send controls and choosing the name of the bus you'd like to use. For this tip, choose the bus named "Reverb" that we previously created.
- Now that we have assigned the send to a bus the controls will become available. We are only concerned with two for this tip the Enable button (resembles a power button) and the Send Level control.
- Toggle the Enable button so that it is lit up and set the Send Level to 0 dB.
So to recap - you should have now created a new bus named "Reverb" with the Sonitus Reverb effect patched into it. We have set this bus to output to the already present "Mix" bus and we have created a send from Track 1 to the "Reverb" bus. A diagram of our new signal flow is below.
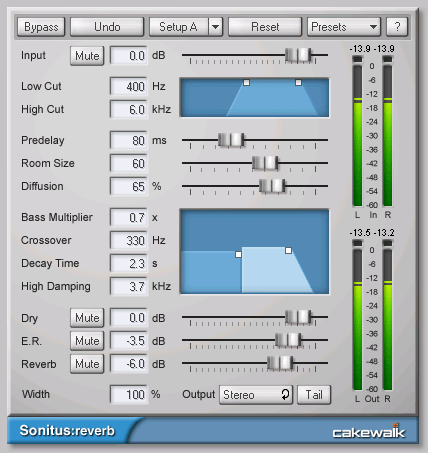
Before we move on - repeat steps A-D for any (or all) of the tracks you'd like to apply reverb too. Finally - let's open the Sonitus Reverb plug-in window. If you don't already it have it open you can do so by double-clicking on it from your "Reverb" bus' fx bin. Apply the following settings:
- From the 'Presets' dropdown in the top choose the Large Hall setting
- When working with reverb as a send effect, we don't want any dry signal in our "Reverb" bus, only the sound of the effect. To achieve this locate the slider for 'Dry' and slide it all the way to the left so the box reads "-Inf." dB.
- We also want to set the 'Reverb' level to "0.0" dB
- Finally locate the 'Output' toggle and set it to "Stereo"
That's it! That is all the reverb settings we are going to make. Now close the Sonitus Reverb window. Now you might be thinking - how do we control how much reverb we hear and how much is applied to each track?
To control how much reverb is applied to a specific track adjust the Send Level control for that track. This will adjust how much of the signal we send to the reverb bus. Experiment with the different tracks and listen to how the mix sounds when adding or subtracting how much of a track is routed to the reverb effect.
To adjust the overall amount of reverb in the mix, adjust the Volume Fader for the "Reverb" track
Experiment and listen! The Sonitus Reverb includes a great variety of presets to get you started but to get the most out of its creative possibilities you'll want to master its different controls, using it as a send effect like we just covered is only one of the thousands of ways you can use this powerful tool in your home or professional studio.