Converting or Recording MIDI to Audio
Last updated on 3/30/2016To understand this process you must first understand what MIDI is: MIDI is an industry standard protocol that is used for communication, synchronization, and control between two or more machines. This data is used to tell a specific piece of equipment (like a keyboard or synthesizer) to play a certain note, at this time, this loudly, for this long, etc.. MIDI does not transmit audio signals (digital or analog). Meaning, if you were to plug your MIDI cable into a loudspeaker or audio device you would not hear anything. MIDI information could be described as being like a piece of sheet music. The sheet music contains everything necessary for an instrumentalist to make music, but without the instrumentalist you hear nothing.
There are several ways you can playback MIDI in Cakewalk, so there are several ways you can convert or record the MIDI to audio. Whichever method you use to playback MIDI is the method you will use to bounce it down to audio. The three main methods are as follows:
- Using an internal software synth built into Windows, like the Microsoft GS Wavetable synth.
- Using hardware that can generate its own sounds, like an external keyboard or synth module.
- Using a software synthesizer (DXi or VSTi) like the Cakewalk TTS-1.
1) Using an Internal Synth (Microsoft GS Wavetable Synth)
This first option is good for those of you who do not have any hardware, like synthesizers; or drivers capable of playing back soft synths without serious delay. The “Microsoft GS Wavetable Synth” can be found under Options | MIDI Devices | Outputs. This will usually not show up here unless you are in the MME (32bit) driver mode.
If this synth is already set up to playback and you hear it through your computer speakers, then you’re half way there. If not, check your Volume Controls under Start | All Programs | Accessories | Entertainment | Volume Control. You can also reach this by going to Start | Run and type in “SNDVOL32” without the quotes. “SNDVOL32 –R” opens the Recording Control. Here you can adjust the playback level of the “SW Synth” which should be the same as the Microsoft GS Wavetable Synth. Next, go to Options | Properties and open up the Recording Controls. Make sure all options under “Show the volume controls” are checked.
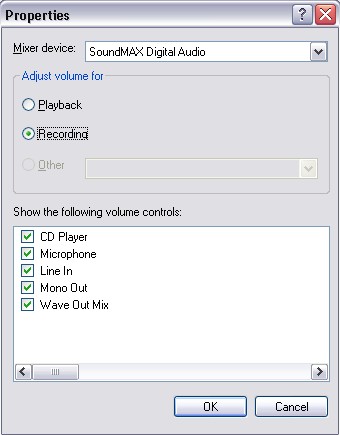
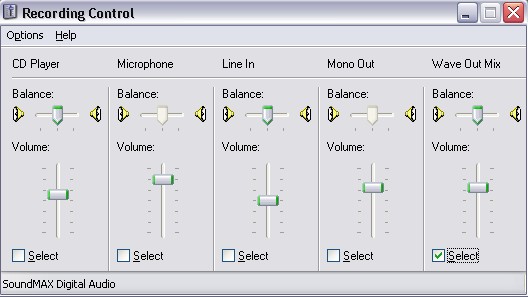
Now press OK to bring you back to the Recording Control. You will need to check either “Wave Out Mix”, “What You Hear”, “Stereo Mix” or any input option that sounds like it will record everything coming out of the speakers. Remember, the goal is to record the MIDI being played back through the GS Wavetable Synth as Audio.
For Vista: Go to Start | Control Panel and open "Sound". Click the "Recording" tab and look for something like "Stereo Mix", "What You Hear" or something similar. Click the "Set Default" button. Double-click on that button to adjust levels and other properties.
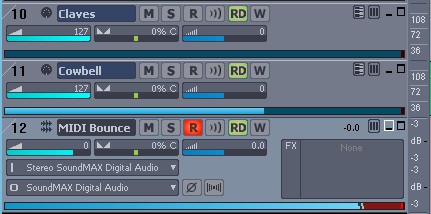
Now open Cakewalk, insert a new audio track from Insert | Audio Track. Make sure the proper input is selected, click the “R” to arm the track for recording, press play and you should be seeing levels on this track. Adjust the levels back in the Recording and Playback controls to ensure that you are not clipping. The picture below represents 2 MIDI tracks being bounced down to the audio track:
Keep in mind that Cakewalk will now be recording everything that is coming out of your computer’s speakers. So if you want to isolate each MIDI track onto its own audio track, you will need to create a new audio track for each MIDI track, then solo the corresponding tracks one at a time. This will require a separate pass for each MIDI track bounce. Otherwise, just hit record for a mix of the entire MIDI arrangement down to one track. Highlight the new audio track and go to File | Export Audio if you are exporting to CD or MP3.
2) Using a hardware synth
This method is similar to using the internal synth method above, but this time we will be recording from an external source, rather than internal. The most important step here is getting the audio, which is being played back from the synth, into the sound card. Remember, the MIDI cables don’t carry audio, so you must have some kind of audio cable connected to the sound card from the synth in order to record it. Route the audio output (or headphone out) from the external synth to the Line-in of your sound card. This may require an adapter like ¼ inch to 1/8th inch, or RCA to 1/8th (depending on your sound card input type).
Once you are connected to the Line-in it’s time to switch the input on your sound card. Go to Start | Run and type in “SNDVOL32” (without the quotes) to open the Volume Control. “SNDVOL32 –R” opens the Recording Control. Check the “Line-in” option. For Vista: go to Start | Control Panel and open "Sound". Click the "Recording" tab and select “Line-in”. Click the "Set Default" button. Double-click on that button to adjust levels and other properties.
Now that you are connected properly and have the correct input, it’s time to set up your audio track. Insert a new audio track from Insert | Audio Track. Make sure the proper input is selected, click the “R” to arm the track for recording, press play and you should be seeing levels on this track. Adjust the levels back in the Recording and Playback controls to ensure that you are not clipping.
If you want to isolate each MIDI track onto its own audio track, you will need to create a new audio track for each MIDI track, then solo the corresponding tracks one at a time. This will require a separate pass for each MIDI track bounce.
Note: When using Hardware Synths, you need to be in Multitimbral mode to play more than one MIDI track at a time (up to 16). When you are in multi mode, many synths must sacrifice certain effects, panning and articulation capabilities in order to make room for the multiple MIDI Channels. Whenever you bounce from a hardware synth, it’s best to bounce one MIDI track at a time in “Single Voice” mode, sometimes called “Patch” or “Program” mode. This will allow you to bounce each MIDI track with the synth’s full effects available for that particular patch. In order to do this, you must set each MIDI track to Channel 1 in Cakewalk and solo and record, one at a time. Otherwise, just hit record for a mix of the entire MIDI arrangement played back in multitimbral mode bounced down to one track. Then select the audio track by clicking on the track’s number and go to File | Export Audio.
3) Using a software synthesizer (DXi or VSTi)
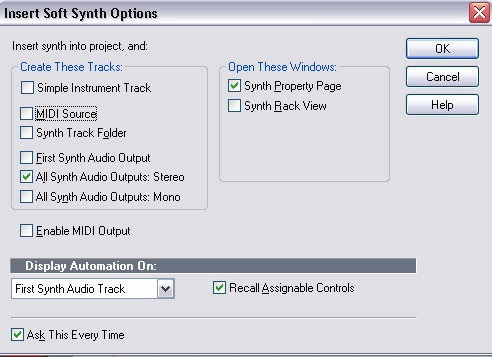
This example uses the multitimbral DXi Cakewalk TTS-1. All Cakewalk sequencing products (Music Creator, Home Studio and SONAR) come with various soft synths. You may not have the Cakewalk TTS-1 DXi included in your version. If that is the case, substitute another soft synth for it. No other method of bouncing MIDI to Audio is faster or more effective than using a soft synth DXi or VSTi. We will go over some of the various tricks available when bouncing DXi, but first, let’s set up the test project. Open the “Latin” demo under File | Open - Sample Content. Once open, go to View | Synth Rack, press ‘O’ to bring up the Synth options. Make sure you check the following options pictured below. There’s no need to create a new “MIDI Source” track unless you plan on adding more instruments. Check “All Synth Audio Outputs: Stereo”. Note: Only SONAR 7 and higher will have all of the Options displayed here (i.e., “Mono Synth Outputs” and “Enable Audio Output”).
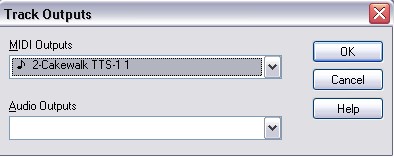
Now insert the TTS-1. The next step is routing the MIDI tracks to the appropriate output. The easiest way to do this is by going to Edit | Select | All, then Tracks | Property | Output. Change the MIDI Output to the “Cakewalk TTS-1” and the Audio Output to your main sound card output.
That’s it, press ‘Play’ and you should see channels 1, 2, 3, 4 and 10 change automatically in the TTS-1. The best part about using multitimbral soft synths in SONAR is its ability to route specific MIDI channels to independent outputs. You’ll see that the TSS-1 created 4 new stereo tracks. Now we can route each patch (or MIDI channel) in TTS-1 to one of the 4 independent outputs. Make sure the TTS-1 interface is in view, then click the “System” button circled in red, followed by the “Option” button. This will bring up the “Output Assign” options. See below:
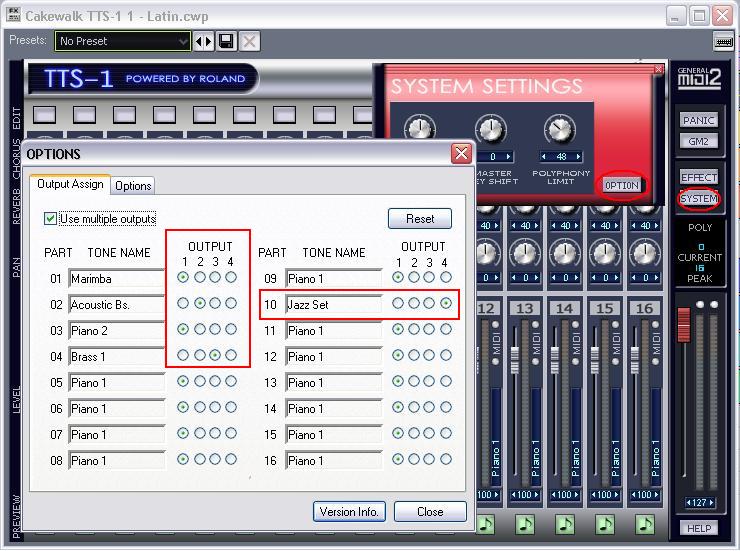
Here you can set each instrument to an independent output. You can see that Marimba and Piano are going to output #1, Bass goes to #2, Brass to #3 and all percussion on #4. Close out of the TTS-1 and name the 4 Stereo audio tracks accordingly: Keys, Bass, Brass, and Percussion. You can simply insert effects on each of these tracks, adjust levels, panning and then Export your stereo WAV file faster than real time.
Exporting Tracks as separate WAV files
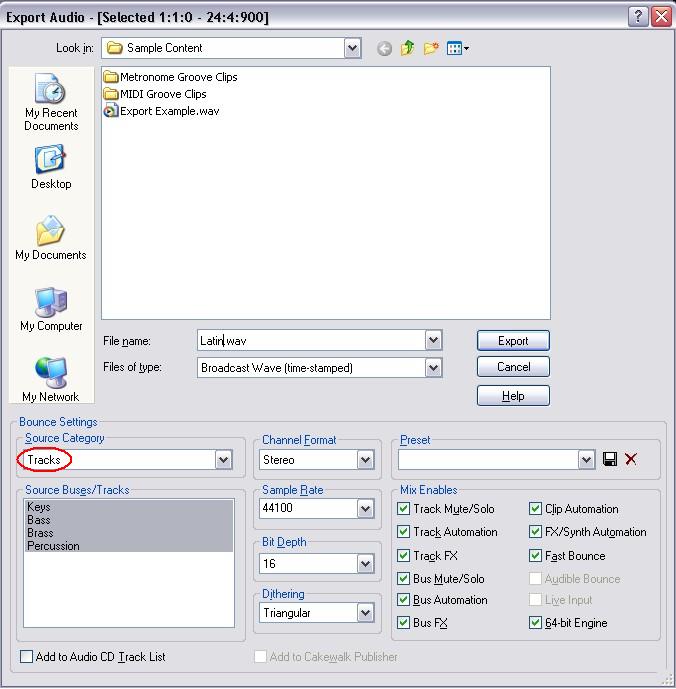
Exporting this project as separate audio files is very simple because of the use of multiple synth outputs. This method comes in very handy if you are handing off your MIDI parts as “Stems” to another studio for the final mix. Just go to Edit | Select All, then File | Export Audio. Choose “Tracks” under the Source Category (circled in red below). Name the WAV file, then click “Export”. This will export a separate file for each audio track, automatically renaming them. A great technique for bouncing multiple tracks as separate WAV files in one quick process.