Configuring SONAR LE for use with Samson USB microphones
Last updated on 3/21/2016To configure SONAR LE for use with your Samson USB microphone
- Launch SONAR LE and go to Options | Audio.
- On the Advanced Tab, set your Driver Mode to “MME (32-bit)” and click [Apply]*.
- When prompted with the message "We must now perform a series of tests... Would you like your hardware to be tested now", click [Yes]. When the test has finished, click [Close].
- In Options | Audio on the Drivers Tab, highlight your Samson microphone for Input Drivers and click [Apply]*.
Note: Depending on your model microphone it may be listed by its model number or simply as "USB Audio CODEC" or “USB Audio Device”.
a) If your Samson mic contains a headphone output jack, then highlight it for Output Drivers.
b) If your Samson mic does not contain a headphone output jack, then select your internal sound card or audio interface for Output Drivers.
- In Options | Audio on the General Tab set your Record Timing Master to your Samson microphone.
a) If your Samson mic contains a headphone output jack, then assign your Playback Timing Master to it as well.
b) If your Samson mic does not contain a headphone output jack, then select your internal sound card or audio interface for Playback Timing Master.
- Click [Apply]* and then click [OK]. If prompted to restart SONAR LE, do so now. SONAR LE is now configured to use your Samson microphone for recording.
* Note: Throughout these instructions if you do not see an [Apply] button in your software, click [OK] instead. If you are prompted with the message “Changes will not take effect until next time you start the program…” close SONAR LE by going to File | Exit. Afterwards, reopen SONAR LE.
To configure a track for recording:
- Create a new project by going to File | New and select "Normal" from the list of templates. Click [OK].
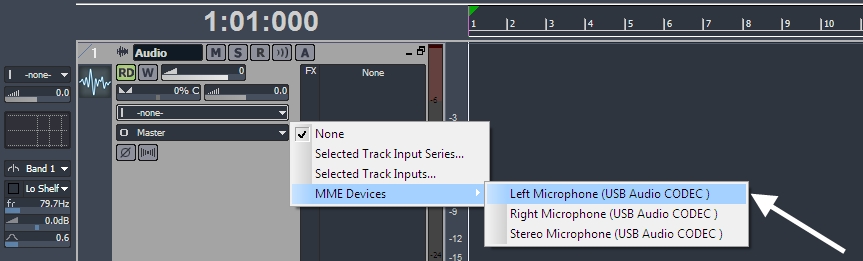
- Click on Track 1's maximize button (indicated by the arrow below) to expand the track and see its parameters.

- Assign your input to your USB microphone’s left input as indicated by the arrow in the picture below:
- If necessary, assign your output to your internal audio card or audio interface. If your Samson microphone has a headphone jack, then assign the output to your microphone.
- After assigning your inputs and outputs, click on Track 1's Record ARM [
 ] button so it is depressed [
 ] to arm the track for recording.
 - If you also want to listen to your microphone as you are recording, click on the Input Echo button [
 ] so it is depressed [
 ].
].
Note: When input monitoring, you may hear a delay due to latency. This can be adjusted by reducing your Buffer Size under Options | Audio | General. If you experience distorted audio or dropouts, increase your buffer size. If your mic supports direct monitoring and you wish to use this instead, turn off Input Echo.
- To begin recording, click on the Record button on the Transport.
For additional assistance with setting up your Cakewalk software, please contact Cakewalk at http://www.cakewalk.com/Support/Contact.aspx
For additional assistance with your Samson hardware, please contact Samson at http://www.samsontech.com/