Using Project5 and SONAR in your Studio
Last updated on 3/31/2016We frequently hear SONAR users asking how Project5 will benefit their creativity. It’s important to realize that both applications are powerful in their own right, and they offer different approaches to music making and different workflows. While it’s true many people use one program or the other exclusively, it can be very inspiring to use Project5 and SONAR together through Rewire. With Project5 Version 2, SONAR users with ReWire support (versions 2, 3, and 4) now have the opportunity to wield tools like the new GrooveMatrix, adding amazingly flexible pattern-based production to their SONAR projects.
The GrooveMatrix in Project5 Version 2 is a powerful non-linear performance and composition tool. Even though SONAR 4 is already a highly capable soft synth host, combining its production power with the advanced workflow of Project5 Version 2 and the GrooveMatrix can open up entirely new ways to write a song. Let’s explore one possible method to help get you started:
Start by launching SONAR. For this example let’s keep things simple. Use a blank project in SONAR. Now to add Project5 to your workspace, go to the Insert pull-down menu and choose Project5 from the Rewire section of the menu. (Choose Rewire Device | Project 5.) SONAR’s Insert Synth Options window may come up. If so choose Add First Synth Output, MIDI Source Track, and Synth Rack view. After you click OK SONAR will add an audio track so you can hear output from Project5, a MIDI track to start recording into, and the Synth Rack view will pop up with Project5 version 2 listed. Now to open Project5 all you have to do is double-click its name in the Synth Rack view.
After Project5 finishes loading, click File | Open in Project5 and load the project called GrooveMatrix, by Jesse Jost. Once the project is loaded, go to View | Show/Hide GrooveMatrix to expose the GrooveMatrix pane. (shown below) This is the section of the track view we’ll be working with primarily.
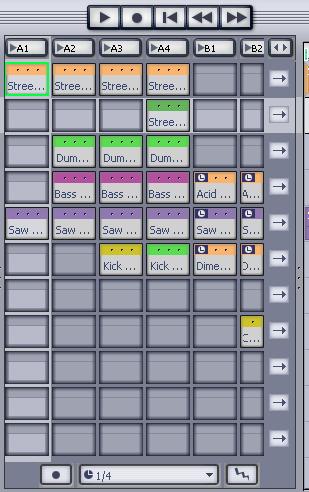
The next thing we need to do is make sure the GrooveMatrix will playback alone, without the patterns in the arrange pane. To do this just click the global track override button so that each track override arrow is pointing towards the GrooveMatrix. (Shown below circled in red)

The last thing to do before recording the performance into SONAR is map each groove header to a key on your keyboard controller. Start with the groove header labeled A1 shown above circled in green. Right-click it and choose MIDI Remote Control. In the MIDI Remote Control window, click the Learn button and press a key on your MIDI keyboard. Then click Stop Learning and the OK button. Now that key on your keyboard will trigger the entire column of cells under A1. Continue mapping each groove header to keys on your keyboard until each active column is mapped. Since each vertical column corresponds to a section of the song, you’ll notice you now have the ability to play the song from your keyboard. The beauty of Project5 is just about everything can be remote controlled by MIDI data in this manner. This means you can map individual cells in the GrooveMatrix for even more precise control. For this exercise though, let’s stick to mapping just the groove headers.
So, now that we have a playable, pattern based song structure in Project5. Let’s take advantage of SONAR’s recording capabilities. Switch your view to SONAR. Locate Project5’s MIDI track and arm it for recording. Make sure you set the MIDI track channel output to the same channel that your keyboard uses. Then just hit the record button in SONAR and start triggering your song. When you’re finished with your performance you can play it back, edit it, or freeze it and export it, along with your other SONAR tracks to later put on an audio CD.
The beauty of Project5 is how easy it is to get a song started, and how well it works as a sketchpad to get an idea out of your mind and on to your computer. You can use this same technique mentioned above to build a new track in Project5, and create and record your own song. The vertical panes in Project5 make it easy to divide your songs into different sections. For example, the first pane can be your intro, the second can be the verse, the third can be the chorus, and the fourth can be a bridge or solo. Once you have organized the GrooveMatrix into different sections, you can then grab loops and start filling out cells within each pane. Preview transitions from different sections of the songs to see how they flow; pick and choose loops that work the best; change the tempo or pitch of the song on the fly. Once you have your song idea done, you can record it directly into SONAR. This technique also works great for creating backing tracks. Singer-songwriters and those without a band can just bring their laptop to a gig, plug-in, and play along with pre-recorded tracks.
We will be featuring more Project5 tips in the coming weeks. Stay tuned.