V-Studio 700 Fantom VS firmware update instructions
Last updated on 3/29/2016Before proceeding, check the currently installed firmware version of your hardware to determine if this update is necessary. For instructions on how to do this click here.
The most recent version of the Fantom VS firmware is version 1.30. The 1.30 firmware includes updates to make the VS-700R compatible with the ARX Expansion Series. For details on the previous Fantom VS 1.10 firmware click here.
Fantom VS Firmware Installation Instructions
- Download the VS700_Firmware file from the download link below
- Extract the contents of the package by right-clicking on it and choosing "Extract All". On Mac OSX extract by double-clicking. Note: be sure to unzip it to a location on your computer that you can find later
- Locate and extract the contents of the folder for the firmware version you wish to install
- Turn off the VS-700R and disconnect the USB cable
- Ensure that the only connection made to the VS-700R is the power cable
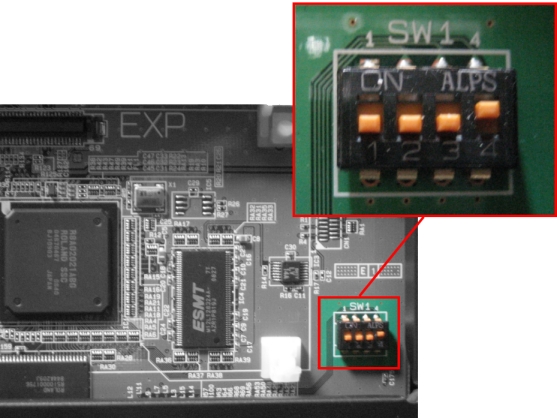
- Remove the expansion cover located on the VS-700R's top panel
- At SW1, located at the far right, flip switch "4" up to the ON position. All other switches should remain in the OFF (down) position as shown in the following image:
- On the left side of the VS-700R's front panel, set the SAMPLE RATE knob to "192 kHz"
- Switch on the VS-700R's power
- Verify that the [USB], [CONSOLE], [MIDI IN], and [MIDI OUT] LEDs on the VS-700R's front panel are blinking
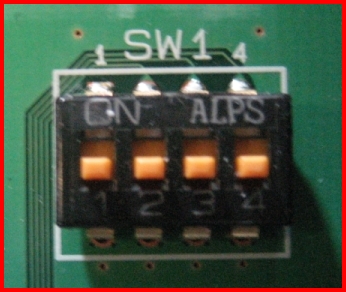
- Move switch "4" of SW1 back to the "OFF" position on the VS-700R as shown in the following image:
- Verify that the LED's that were blinking in step 10 have stopped blinking
- Connect a USB cable from the VS-700R to your computer
- Verify that the VS-700R's [USB] and [MIDI OUT] LED's are illuminated
- Open the extracted folder on your computer that contains the firmware version you wish to install
- Locate and start the application 'UpdSMFJ.exe' by double-clicking on it
- In the "MIDI Out Device" field, select [FANTOM VS (VS-700)] (NOTE: this is listed as [FANTOM VS] on a Mac)
- In the "SMF Path" ("SMF Folder" on a Mac) specify the name of the folder that contains the FantomVSUpdate.mid file. This should be located in the same folder unless you moved it. You can browse to it by clicking the Path button
- Click Scan SMF and verify that the file is loaded (not required on a Mac)
- Click Send
- Data transmission will being and the VS-700R's [MIDI IN] LED will blink. Your computer will show a progress bar
- The update takes about three minutes to complete NEVER turn off the power while the update is in progress.
- When the VS-700R's [MIDI IN] and [MIDI OUT] LEDs both blink, the update has completed
- In the UpdSMF utility the Send SMF Complete dialog box will appear, click OK
- In the UpdSMF click EXIT to close the utility (QUIT on a Mac)
- Switch off the VS-700R's power
- Switch on the VS-700R and restart the VS700R IO Editor to confirm that the new firmware version is installed. For instructions on how to do this click here.
- The update is complete, you can now switch off the VS-700 and replace the expansion cover
 Download the Fantom VS Firmware Update