Cakewalk // Documentation // Cakewalk // Using the AudioSnap palette
Table of Contents Previous Next Index

AudioSnap ► Using the AudioSnap palette

*
Do one of the following:
*
On the Views menu, click AudioSnap Palette.
A. Bypass B. Copy as MIDI C. Split into clips by transient markers D. Toggle sample/musical based clip start time E. Average Tempo F. AudioSnap properties G. Set project tempo from clip H. Clip follows project tempo I. Edit clip tempo map J. Quantize K. Extract Groove L. Apply Groove M. Applies to N. Online stretch method O. Offline stretch method P. Threshold Q. Resolution
*
Bypass . This button enables or disables AudioSnap on selected audio clips.
*
Copy as MIDI 
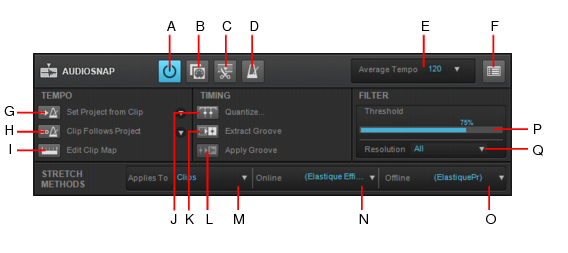
. This button saves the selected audio as a MIDI clip, which you can paste from the Clipboard into a MIDI track. You select the MIDI note that the transients in the audio clip will be converted to in the AudioSnap Options dialog box, which opens when you click the Options button.
*
Split Beats into Clips . This button splits a clip at each transient marker into multiple clips.
*
Clip Timebase (Absolute or Musical) / . There are two timebase settings for a clip in Cakewalk:
*
Musical (default) . Musical Timebase means the clip start position will follow Musical Time (MIDI Tick).
*
Absolute . Absolute Timebase means that the clip start time will follow Absolute Time (SMPTE).
*
Average Tempo. This list shows the average tempo candidates: original, 0.5x and 2x. Cakewalk will do its best to detect the correct average tempo, but a clip can often have multiple potential tempos (60 BPM, 120 BPM, 240 BPM, etc.). If Cakewalk is unable to detect a tempo, Average Tempo will be set to the original project tempo at the location the clip was recorded or imported. If you change the Average Tempo setting, all clip tempo changes are adjusted to scale.
This list also contains the Set Clip Tempo From Project command, which copies the project’s tempo map to the clip’s tempo map. This allows the project’s measure boundaries to align with the audio clip.
*
AudioSnap Options . This button opens the AudioSnap Options dialog box. This dialog box has its own Help topic, which appears when you click its Help button.
*
Set Project Tempo From Clip .  This button copies the clip’s tempo map to the project’s global tempo map and automatically triggers the Clip Follows Project Tempo command. This allows the project’s measure boundaries to align with the audio clip. The drop-down list lets you specify at which resolution the clip’s tempo map should be copied to the project tempo. The options are as follows:
*
Clip Follows Project Tempo .  This button forces the clip to follow the project’s global tempo map. The drop-down list lets you specify at which resolution the clip should follow tempo changes. The options are as follows:
Note: The Clips follow project tempo command only works on clips that are configured to use musical time (the Time Base property is set to Musical in the Clip Properties Inspector).
*
Edit Clip Tempo Map . Each audio clip has an internal tempo map. This button exposes controls that allow you to edit a clip’s tempo map. For details, see Editing a clip’s tempo map.
*
Quantize . This button opens the Quantize dialog box, which has options to quantize AudioSnap Beats and Audio Clip Start Times, and also to set automatic crossfade options.
*
Extract Groove . This button adds the selected clip’s transients to the Pool (see Using the Pool) and shows vertical Pool lines. To apply the pool (groove) to another clip, select the desired clip and click the Apply Groove button. To clear the Pool, click the Extract Groove button again.
Note: If an existing Pool exists when you click the Extract Groove button, the existing Pool will first be cleared.
*
Apply Groove . This button applies the currently extracted groove (Pool) to the selected clips, clears the Pool and releases the Extract Groove button. See also To quantize an audio clip to another audio clip (Quantize to Pool).
*
Threshold. This slider is available when a clip’s transient markers are showing. The slider disables markers based on their volume. This clears out unwanted markers to make editing easier. Dragging the slider to the right creates a bigger volume threshold, which disables markers that are fall below that threshold. Works on selected clips.
*
Resolution. This drop-down list is available when a clip’s transient markers are showing. The selected Resolution value lets you disable markers based on their time location. This clears out unwanted markers to make editing easier. Larger values create a bigger time window, based on musical time values, which preserves markers that are closest to the displayed musical time value, and disables others. Works on selected clips.
*
Applies To. This drop-down menu lets you choose whether any changes to the Online and Offline settings apply to clips, tracks, or the default settings. The choices in the drop-down menu are as follows:
*
Clips. When selected, the Online and Offline stretch method settings apply to any selected clips. The Online and Offline lists display the current stretch methods for the selected clip. If you select multiple clips that have different stretch methods, the Online and Offline lists display (Multi). If the selected clip has inherited stretch method settings from the track or from the Default Settings settings, the Online and Offline lists display the inherited stretch method in parenthesis.
*
Tracks. When selected, the Online and Offline stretch method settings apply to all current and future clips in the selected tracks.
*
Global. When selected, the Online and Offline stretch method settings apply to the Default stretch method.
*
Online. This choice determines what stretch algorithm is used during real-time playback. For more information about stretch methods, see Algorithms and rendering. The options are as follows:
*
Groove. This mode works faster than Percussion stretch method, using less processing power.
*
Percussion. This mode works better than the Groove stretch method on percussive material, especially if the stretching is by more than a few beats per minute.
*
Elastique Pro. Elastique Pro is a general purpose high quality time-stretching engine that fulfills the demands of professional productions and broadcast applications. It minimizes stretching artifacts, offers stable timing, inter-channel phase coherence and sample accurate stretching which allows for sharp transients and crystal clear vocals.
*
Elastique Efficient. Elastique Efficient gives you similar time-stretching quality as Elastique Pro, but with a lower CPU hit. The algorithm is targeted at complex polyphonic signals like complete mixes and offers the same transient preservation as Elastique Pro.
Note: The Online stretch method is for preview purposes only during playback. The final audio quality will be greatly improved after the Offline stretch method is applied during mixdown/export.
*
Offline. This drop-down menu lets you choose the algorithm that is used when you export or freeze stretched audio. The choices in the drop-down menu are as follows:
*
Radius Mix. Better for clips containing polyphonic, stereo data.
*
Radius Mix Advanced. Similar to Radius Mix, but exposes Radius Pitch Coherence and Radius Phase Coherence sliders in Edit > Preferences > Audio - Playback and Recording.
*
Radius Solo. Better for clips containing monophonic, solo instruments.
*
Radius Solo (Bass). Better for clips containing solo bass instruments.
*
Radius Solo (Vocal). Better for clips containing solo vocals.
*
Elastique Pro. Elastique Pro is a general purpose high quality time-stretching engine that fulfills the demands of professional productions and broadcast applications. It minimizes stretching artifacts, offers stable timing, inter-channel phase coherence and sample accurate stretching which allows for sharp transients and crystal clear vocals.
*
Elastique Efficient.Elastique Efficient gives you similar time-stretching quality as Elastique Pro, but with a lower CPU hit. The algorithm is targeted at complex polyphonic signals like complete mixes and offers the same transient preservation as Elastique Pro.
*
Same as Online. Uses the same choice as the Online field.
This variable should be set in the [WinCake] section. For example:
Copyright © 2024 Cakewalk, Inc. All rights reserved
Sitemap | Privacy Policy | Legal