Project5 Basics, Part 1 of 2
Last updated on 3/29/2016By Jesse Jost
|
Welcome to the first of a two-part introduction to Project5. The goal of this article is to familiarize you with P5's two most essential elements, Signal Flow and Pattern Basics. Understanding these topics will help you wrap your head around the heart and soul of P5's workflow. Grasping P5's basics may require that you abandon some old notions about software sequencers. In the second article we'll examine some of the more advanced tricks and techniques. But for now, you'll see that even P5's basics are not so typical. |
Table of Contents I. Signal flow II. Pattern Basics |
PART 1: BASICS
Signal flow is the most important aspect to get. It ties together MIDI filtering, audio mixing, effects, and the views. Because Project5 is strictly a soft synth environment, all sound generation originates within the application. MIDI goes in, audio comes out.
The audio path originates with a DXi or VSTi, which is controlled by a rather sophisticated MIDI input filtering scheme. After that, the sound is channeled through a local effects chain and gain stage (mix level), possibly sent to an effects bus, and terminates at the master gain stage where the bits are then pumped to your hardware mixer.
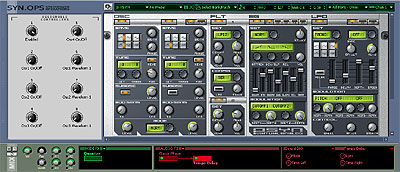
Signal flow is managed in the Track Pane and Syn.Ops (for Synth Operations). Syn.Ops provides an exploded view of the currently selected track, most importantly displaying the synth's property page and the patch point for MIDI and audio effects.
Synths are initially patched into the track pane, which abuts the track view (aka Tracker). The track pane also serves as the mixing console and provides several unique features designed to accommodate an unfettered workflow:
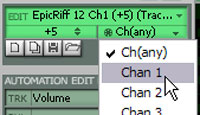
A one-to-one correspondence exists between soft synth and track, because it is assumed that one track will usually be used for a single voice. Arranging becomes a lighter task since all patterns in a given track will go directly to that synth. However, accommodations are made for those wishing to use multi-timbral instruments, such as being able to assign track patterns to any MIDI channel (more on that later).
You can specify the MIDI port and channel through which and instrument receives event notifications. In this there are two powerful implications:
- Specifying different ports allows you to use multiple controllers simultaneously to play your instruments. This is ideal for performing simultaneously with others.
- Using the same port/channel for MIDI input for all of your instruments means that a single controller can play all instruments simultaneously. This provides the most direct method of layering multiple synth voices. This makes P5 a powerful soft synth workstation.

Syn.Ops provides other MIDI input filtering parameters, such as velocity, key range and key transposition. You'll have a lot of fun setting up powerful configurations with all your synths, just like the pros do.
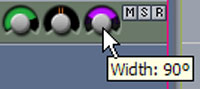
Each instrument output has its own gain stage, providing Mute, Solo, Volume, Pan and Width. Width, which describes the spatial image of a stereo sound, is not a parameter that typically found in audio applications. The value here is your ability to create lush pads and generally more elaborate sound scapes.
Audio Output Selectorhe output selector appears on the track strip when you insert an instrument that has more than one output. As you scroll to select an output, the mix controls update to show the settings for the currently selected output. In the spirit of keeping a clean workspace, only one track strip is consumed for all the instrument's possible outputs.
This has implications in Syn.Ops too, as the patch bay for effects updates to show you what's patched in at a specified output.

In contrast to SONAR or other audio/MIDI sequencers, the track view is comprised of patterns, not clips. Patterns are the atoms of your song arrangement. In P5, even audio lives inside a pattern. All patterns roll out and repeat at their specified loop points, like Groove Clips in SONAR. This makes song development a breeze of course.
Inside the Track View, patterns appear as three different types:
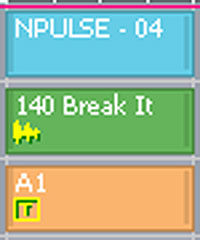
- Regular - no special icon; indicates the pattern contains MIDI and automation data exclusively
- Audio - an icon of an audio waveform appears in the bottom left of the pattern; indicates the pattern contains audio data
- Trigger - a "T" icon appears in the bottom left; a specified Synchron 32 pattern is triggered for the duration that this pattern is rolled out (Synchron 32 is an analog style sequencer plug-in, worthy of its own article)
Patterns are edited in P-SEQ (the Pattern Sequencer) and typically consist of MIDI events and automation for your synths and effects. Sometimes you may want to have a pattern that is nothing but filter sweep automation, and place it strategically throughout the arrangement.
When you make changes to a specific pattern, other instances of that pattern are also affected, a terrific time saver. In cases where you'd like a pattern to break off its family ties, you can simply "dupe" it from P-SEQ.
There are, however, a couple attributes which will not affect other instances of the same pattern. These "instance attributes" include MIDI channel and Pitch Transpose. Transpose works on audio and MIDI clips.

The MIDI channel of pattern tells a multi-timbral synth which voice to play (you can overlay patterns in Tracker). Thus even patterns also play a role in the MIDI filtering aspect of P5's signal flow.