Project5 Basics, Part 2 of 2
Last updated on 3/29/2016By Jesse Jost
|
Welcome to the conclusion of a two part introduction to Project5. In the first article we covered rudiments such as signal flow and patterns. This time around we'll explore a few advanced concepts that build on the first discussion. |
Table of Contents I. Introducing the Pattern Bin II. Synth Insight |
PART 2: BASICS (continued)
I. INTRODUCING THE PATTERN BIN
The Pattern Bin provides a dedicated resource for browsing and auditioning Project5 patterns. A pattern is a sequence of MIDI events and automation, which you can drag directly into your arrangement to be played on any synth track. Therefore a pattern's true identity surfaces when you it plays through just the right synth and effects chain.
Out of the box, P5 provides you with dozens of patterns to get you started. Some of the drum patterns are designed to work with P5-specific synths, so let's hear how they come together by using the all-important Pattern Preview function. Pattern Preview works in conjunction with P-SEQ (P5's Pattern Sequencer). Let's set up our workspace:
1. In the Tracker, insert the synths PSYN (analog synth) and Velocity (drum sampler)
2. Bring the Pattern Bin into the workspace (View-Pattern Bin or ALT+3)
3. Expand the Disk tree
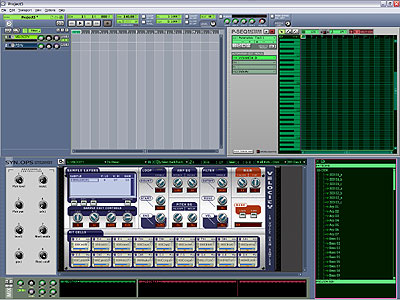
Your screen might look something like the one pictured above, with the Pattern Bin located in the bottom right. Now we'll audition some Velocity patterns:
- Click on the Velocity track so that it becomes highlighted and the synth interface appears in Syn.Ops (this tells us what will be playing the pattern)
- In Syn.Ops (Synth Operations), click Velocity's Load button and select "Trance Kit 01"
- In the Pattern Bin, scroll down to the patterns starting with "Trance Kit…" and double-click on "Trance Kit 01_a". The pattern's events are now displayed in P-SEQ.
- Press the Preview button in P-SEQ
Velocity should be trancing out right now. Now try previewing the other Trance patterns, moving down list in succession. When you find the pattern you like, click P-SEQ's Send To Track control. The pattern is now part of the song and can be arranged as you see fit.
There are some tasty analog-style synth patterns too, so let's audition a few in PSYN:
- Click on the PSYN track so that it becomes highlighted and appears in Syn.Ops
- In Syn.Ops, right-click on PSYN's patch bank "B" and select the patch "Perky Bell"
- In the FX Graph, located at the bottom of Syn.Ops, click on the effects menu and select Effects-Project5-Tempo Delay (no need to tweak the plug-in, its default settings provide a shuffle-delay, perfect for electronic genres)
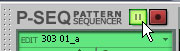
- In the Pattern Bin, scroll to the top of the pattern list and double-click on the pattern named "303 01_a"
- Press the Preview button in P-SEQ
As you did with Velocity, begin auditioning other patterns in the 303 section, and then try other pattern sections. You can also try changing PSYN patches while the pattern plays. Auditioning material has never been so much fun!
- You can audition track contents and Pattern Bin material simultaneously by clicking Play in the main transport, then previewing patterns in P-SEQ per the above examples
- Change P5's the tempo while your auditioning patterns; tempo changes are as smooth as glass and fun to use because all the synths and effects synchronize their LFOs, delay lines, etc, to the host tempo
Project5's synthesizers are an integral part of the package, so here are a few tips you should be familiar with.
DS864 Programs
The DS864 (AKAI S1000/S3000, SF2, Kurzweil K2000, WAV, AIF) provides 8 independent voices and 8 assignable stereo outputs, which makes for some serious mixing and layering potential. It's all managed by the control cluster in the sampler's top-left area.
DS864 programs are comprised of up to 8 layers, each layer containing a unique voice, but you can get up and running with just one layer. Multiple layers are useful for only for complex, multi-timbral patches. But when the situation calls for a super-patch, you'll want to know how…
To create a multi-layer program:
- Click on the layer menu and select one of the available 8 channels
- Now load a new layer (*.dp8) from the layer browse dialog, opened by the adjacent Open control, to the right of the menu
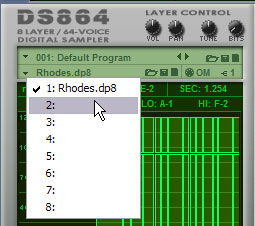
You now have a two-voice patch. You can specify unique MIDI channels and audio outputs for each or use the same. Also note that all of the sampler's parameter settings (filters, envelopes, LFOs, etc) are unique to each layer, providing serious sound sculpting muscle. When you have the program dialed in to your taste, save it as such using the Save control above in the top-most Program Control section.
DS864 "Perfect Piano" Tip
Follow this quick-and-easy recipe for a killer piano sound that's light on resources:
- Insert the DS864 and open program "Piano, Gold.ds8" (this is just a one layer patch, so it's not too RAM intensive)
- In the FX Graph, located at the bottom of Syn.Ops, click on the effects menu and select Effects-Project5-Studioverb2
- In the plug-in's preset menu, select "Piano Room, Med"
Now you have the ultimate utilitarian piano, sure to sound great in any mix. Go tickle them ivories!
Mega-flams with Velocity
Want your drums to sound like they were freaked out by your favorite remix artist? Here's a quick guide to get those electronic flams happening in Velocity.
- In Velocity, load the kit "Layered Acoustic"
- Click on the snare pad, E4, to audition the sound and set focus to this voice
- In the Loop section above, click the Enable control
- Now set the loop points using the Start and End controls; for now, just set the End time to 0.031 (seconds)
Tip: In order to achieve this fine setting, hold down the [SHIFT] key while you drag on the control with the mouse. This gesture provides a "fine-tune" control for all of Velocity's parameters.
- Set the Count control to 10
Now trigger that pad again and start remixin'!
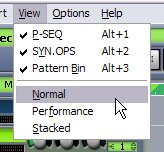
Here's an undocumented trick relating to P5 Layouts (*.p5l). Layout files are just a way to recall window dimensions to assist in workflow. Out of the box, P5 gives you three: Normal, Performance and Stacked.
Want to make your own? Here's how:
- Set the screen up exactly the way you want it (don't worry about track data, synths and effects - layout files don't include these)
- In the main app menu, click File-Save As…, then browse to P5's root directory (usually c:\program files\cakewalk\Project5)
- Type a name for your layout, being sure to manually modify the file extension so that it reads ".p5l". Example: "My First Layout.p5l"
- Click Save
The next time you launch P5, your new layout will be ready to greet you in the in the View menu (Fig. 10).
